How-To: Block Websites

Blocking websites is a good start when it comes to parental control.
It's also good if your child's device has social media apps that won't uninstall. The moment a social media app is installed on a device (or visiting a website), data brokers start getting all the information on that device by using trackers and loggers.

Blocking websites, trackers, loggers, even ads will help for future employment and college enrollment. Employers often use data brokers for background checks, and all that data might be showing up in the reports.
Which may hurt chances for specific employment, college enrollment, price of insurance premium, and much more.
Side Note:
Apple says THEY don't collect data, but they use a 3rd party data broker to do it for them.
Apple, Google, social media is not your friend.
But, what sites should you block and where do you block them?
Well.... Let's begin.


Option #1: Block websites on router
This is a secure and reliable solution to block a website. To block a website on Router level, you have to login Router backend and add the websites you want to block in Blacklist.
You have to enter the Router Gateway address on the browser to get backend access. Please see the list of most used router gateway address to get the backend access.
Most router interface almost look the same way and you can block the website by adding them to the Blacklist. But some routers do not have the option to block website from the backend. We have to depend on a DNS to block the website in those cases (which I think is best anyway).
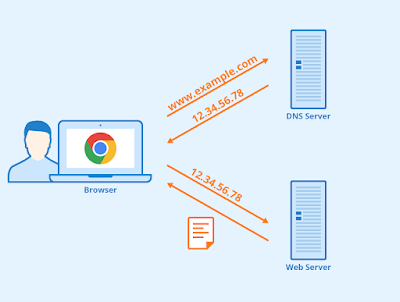
Option #2: Use a custom DNS
What's a DNS?
Domain Name Service is like the phone book of the internet. It associates the website server IP to a website URL. With a custom DNS you can block ads, trackers, and loggers.
This can be added to the router or by the device. But note, the some routers cannot override the device DNS. If overriding the device's DNS is an option on your router, I suggest to do so.
I use NextDNS. It has a free option and a premium plan, which is $2 a month for unlimited.
NextDNS is simple to use, great instructions, highly customizable, great security, and great customized blocking functions.
Check it out now:
Here’s a list and details of free public DNS:
https://www.lifewire.com/free-and-public-dns-servers-2626062
https://www.lifewire.com/free-and-public-dns-servers-2626062
Option #3: Change the Device's DNS

To setup the DNS on an Andriod device
1. Go to Settings
2. Go to Network & Internet
3. Select Advanced
4. Select Private DNS
5. Type in the URL listed within the NextDNS guide.

To setup on iPhone or iPad
1. Go to Settings
1. Go to Settings
2. Select WIFI
3. Find your wireless network in the list, and then click the "i" symbol.
4. Scroll down to DNS
5. Delete the current DNS and use the one listed within the NextDNS guide.

To setup on Mac
1. Start by going to Mac System Preferences, open Network, and select the network you wish to adjust DNS settings.
2. You can change the DNS for both ethernet and Wi-Fi connections. Click on Advanced.
3. Select the DNS tab in the newly opened window and look for the Add(+) button at the bottom of the DNS servers list.
4. Type the following IPv4 address listed on the NextDNS guide by clicking the Add button after each.
5. When all entries are complete, click OK and then click Apply to save the changes.
You may not notice changes after adjusting DNS settings until you clear the DNS cache or restart the Mac.

To setup on Windows
1. To start, go to the Control panel, open Network and Internet.
2. Select Network and Sharing Center, and click on Change adapter settings.
3. Next, choose the network you are using. If you are using an Ethernet network, right-click Local Area Connection and select Properties. If you are connected to a Wi-Fi network, right-click on Wireless Network Connection and select Properties. Choose your current wireless network.
4. Select the Networking tab, and from the list under This connection uses the following items, select Internet Protocol version 4 (TCP/IPv4) or Internet Protocol Version 6 (TCP/IPv6), and then click Properties.
5. In the newly opened window, click Advanced and select the DNS tab. If you have found any addresses, write them down if you need to switch back to the default settings. Remove them and click OK.
6. In the bottom label, select Use the following DNS server addresses.
7. Write down the entries if they exist. Then remove them and type in the NextDNS address from their guide.
8. Click OK
Option #4: Change the DNS on a browser
The moment you get to a website with data broker trackers, it'll try to get information from your device. Make sure to block permissions that are not needed in the browser settings. Brave is the best out-of-the-box browser.

Firefox browser
1. Click the menu button.
2. Select Settings.
3. In the General menu, scroll down to access Network Settings.
4. Click on the Settings button.
5. Click Enable DNS over HTTPS. By default, it resolves to Cloudflare DNS.

Chrome browser
1. Click on the three-dot menu in your browser window.
2. Select Settings.
3. Scroll down to Privacy and security > Security.
4. Scroll down and enable the Use secure DNS switch.

Mircosoft Edge
1. Click on the three-dot menu in your browser window.
2. Select Settings.
3. Scroll down to Privacy and security > Security.
4. Scroll down and enable the Use secure DNS switch.

Brave
1. Click the menu button in your browser window.
2. Navigate to Settings.
3. On the left side of the menu, scroll down and click Additional settings.
4. Navigate to Privacy and security > Security.
5. Enable Use secure DNS.
6. Select custom DNS.
Side Note:
I also suggest to use Brave Search or DuckDuckGo as your search engine.
Again, Apple & Google are not your friends. They literally sell you out everyday.
Now Do a Test of the DNS
To confirm your DNS setup. Go to:
If your also blocking trackers. Test it here:

What sites should I block?
Here are some of the most common sites to block:
NextDNS will have a good list of sites to block as well. You can add a site to block without needing the device.
Stay Safe and hack the planet